一个二分类的机器学习, 用TensorFlow写的, 刚好看到google提供的免费褥羊毛GPU, 虽然坑很多, 但还是部署上去了,GPU效率真的比CPU强的多多.
官方完整的帮助连接在这里,注意上面的代码是基于Python2的, 我用的python3
数据集准备
CSV之类的轻量数据集
PASS, 有即可
TFRecord重量数据集
可以类似我这样子, 将数据存储到目录下Datasets下, 推荐tar压缩
1
2
3
4
5
|
tar zcvf Datasets.gz Datasets
|
自行配置好谷歌Drive, 链接https://www.google.com/drive/
下载符合电脑版本, 把数据集存入同步到云端.
如何上传
打开你的Colaboratory-new一个jupyter脚本.
小文件上传
for Python2:
1
2
3
4
5
6
7
8
9
10
11
12
13
14
15
16
17
18
19
|
1
2
3
4
5
6
7
8
|
1
2
3
4
5
6
7
8
9
10
11
12
13
14
15
|
from google.colab import files
\# 你需填的:
FILE\_NAME = '想保存到Colaboratory的文件名'
uploaded = files.upload()
with open(FILE\_NAME, 'wb') as file:
file.write(uploaded\[uploaded.keys()\[0\]\])
|
but for Python3:
1
2
3
4
5
6
7
8
9
10
11
12
13
14
15
16
17
18
19
|
1

2

3

4

5

6

7

8
|
1
2
3
4
5
6
7
8
9
10
11
12
13
14
15
|
from google.colab import files
\# 你需填的:
FILE\_NAME = '想保存到Colaboratory的文件名'
uploaded = files.upload()
with open(FILE\_NAME, 'wb') as file:
file.write(uploaded\[list\[uploaded.keys()\]\[0\]\])
|
对应的python执行上述代码后, 会出现Choose file按钮, 选择本地文件确认即可上传, 默认在当前路径, 可用!ls -l查看下
大文件上传
下面开始我就没有试过python2了,都是基于python3
如果是大文件上传, 就按照前面的准备, 我们已经把文件传到了GoogleDrive云盘.
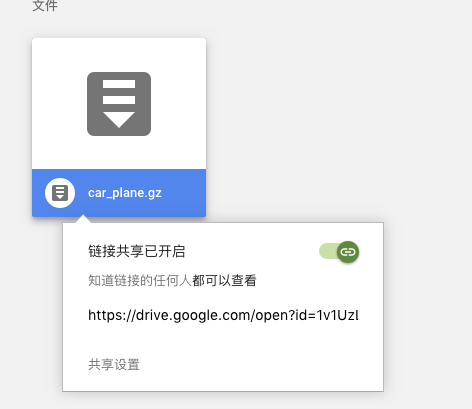
Now, 在浏览器打开Drive找到那个文件, 右键->查看共享链接: -> 拷贝id=后面这个key, 粘贴到下方代码的位置
1
2
3
4
5
6
7
8
9
10
11
12
13
14
15
16
17
18
19
20
21
22
23
24
25
26
27
28
29
30
31
32
33
34
35
36
37
38
39
40
41
42
43
44
45
|
1

2

3

4

5

6

7

8
9
10
11
12
13
14
15
16
17
18
19
20
21
|
1
2
3
4
5
6
7
8
9
10
11
12
13
14
15
16
17
18
19
20
21
22
23
24
25
26
27
28
29
30
31
32
33
34
35
|
\# 这行代码相当于unix,会去帮我们安装这个包
!pip install -U -q PyDrive
from pydrive.auth import GoogleAuth
from pydrive.drive import GoogleDrive
from google.colab import auth
from oauth2client.client import GoogleCredentials
\# 你需填的:
PACKAGE\_ID = 'key粘贴到这里'
PACKAGE\_NAME = 'drive文件的名字还是Colaboratory将存储的名字呢,你自己试试, 我就是填drive对应的名字'
auth.authenticate\_user()
gauth = GoogleAuth()
gauth.credentials = GoogleCredentials.get\_application\_default()
drive = GoogleDrive(gauth)
downloaded = drive.CreateFile({'id':PACKAGE\_ID})
downloaded.GetContentFile(PACKAGE\_NAME)
print('Transpose succeed.')
|
执行上述代码, 会弹出一个授权链接和一个授权码输入框, 授权链接授权后会给你这串授权码,粘贴回车即可.依然可以用!ls -l查看下, Colaboratory有自带一些命令的, 在/bin下, 所以可以用tar命令进行解压:tar czvf Datasets.gz
训练后的内容数据如何下载
训练后的模型-tensorBoardLog等文件我们会把它下载下来, 以便我们后续使用. so, 这里来记录下如何下载下来
小文件
1
2
3
4
5
6
7
8
9
10
11
12
13
14
15
16
17
|
1
2
3
4
5
6
7
|
1
2
3
4
5
6
7
8
9
10
11
|
from google.colab import files
\# 你需要填的:
FILE\_PATH = '下载的文件路径'
files.download(FILE\_PATH)
|
尴尬脸 简单吧,简单到写不下去了
大文件
大文件还是推荐打包, tar:
1
2
3
4
5
6
7
8
9
10
11
12
13
14
15
16
17
18
19
20
21
22
23
24
25
26
27
28
29
30
31
32
33
34
35
36
37
38
39
40
41
42
43
44
45
46
47
|
1

2

3

4

5

6

7

8

9

10

11

12

13

14

15

16

17

18

19

20

21
22
|
1
2
3
4
5
6
7
8
9
10
11
12
13
14
15
16
17
18
19
20
21
22
23
24
25
26
27
28
29
30
31
32
33
34
35
36
37
38
39
40
41
42
43
|
from google.colab import auth

from googleapiclient.discovery import build

from googleapiclient.http import MediaFileUpload

\# 你需要填的:

SAVE\_INTODRIVE\_NAME = '想以什么名字保存到drive'

FILE\_PATH = '想下载的文件路径'

auth.authenticate\_user()

drive\_service = build('drive', 'v3')

file\_metadata = {

  'name':SAVE\_INTODRIVE\_NAME,

  'mimeType': 'text/plain'

}

media = MediaFileUpload(FILE\_PATH,

                        mimetype='text/plain',

                        resumable=True)

created = drive\_service.files().create(body=file\_metadata,

                                       media\_body=media,

                                       fields='id').execute()

print('File ID: {}'.format(created.get('id')))

print('Transpose succeed.')
|
封装起来就轻松很多了
这是简单封装起来, 输入对应参数就直接使用了:
连接: https://drive.google.com/file/d/1L7exa7j9ALc7J_PolwzNO3PlZDBmp4C-/view?usp=sharing